
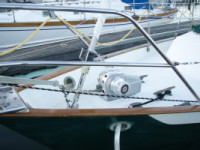
There are few things I can think of that can cause me as much anxiety as the mere thought of drilling large holes in our deck. I agonized over this for many weeks once we had come to the decision that we would do the mechanical install ourselves. The original plan called for having the work done at KKMI in Sausalito, but after the experience we had with them earlier this year when they installed our refrigeration and PSS Dripless Packing Gland… well, that just wasn’t going to be an option. Our dock neighbor Dan eventually got through to me that if you are going to do something like drill large holes in your deck, you might as well do it yourself. I think his rationale was that at least we would have the comfort of knowing we would be taking every precaution to do the job correctly and not risking ruining the deck core. I set out to try and find installation videos on YouTube and elsewhere on the net and I discovered there just was not a lot of information on how to do this job. I decided that I would try and put enough information into this post that it will hopefully help some other person struggling with the same anxiety that I was feeling. The first decision to be made was the selection of a windlass that would best suit Cool Change. ![lofrans-tigres-horizontal-windlass-(1500w)-medium[1]](http://coolchangeadventures.com/wp-content/uploads/2013/02/lofrans-tigres-horizontal-windlass-1500w-medium1.jpg) We went to Pacific Seacraft for advice and they recommended that we use a Lofrans Tigress. There were numerous reasons that the Tigress would be the best fit. To start with, our chain locker is not huge, so we needed to take advantage of a horizontal design with the entire windlass above deck as opposed to taking up valuable space below. Then there was the issue of height of the capstan. The angle of the chain as it contacts the chain gypsy needs to be close to 90 degrees. The design of the Tigress is such that the height of the chain gypsy works with our bulwarks and the height of the bow roller, without needing to build up the height of the windlass pad with a wedge. Another consideration is power. The Tigress has a 1500 watt motor, which will easily handle our 300′ of chain and CQR. We should have more power than we will ever need from this windlass. It has a rope drum that can be independently operated and in an emergency, the windlass can be operated manually using the emergency handle provided. The Tigress operates electrically in both directions and can be lowered by gravity using the clutch if desired. My only complaint so far is that the documentation that comes with the Tigress leaves much to be desired and not much of anything is covered on the operation of the windlass. It is manufactured in Italy, which may explain some of the documentation issues. But as it is a popular model in the US sold by Imtra, I think they should put more effort into making a more usable installation, maintenance, and operation manual.
We went to Pacific Seacraft for advice and they recommended that we use a Lofrans Tigress. There were numerous reasons that the Tigress would be the best fit. To start with, our chain locker is not huge, so we needed to take advantage of a horizontal design with the entire windlass above deck as opposed to taking up valuable space below. Then there was the issue of height of the capstan. The angle of the chain as it contacts the chain gypsy needs to be close to 90 degrees. The design of the Tigress is such that the height of the chain gypsy works with our bulwarks and the height of the bow roller, without needing to build up the height of the windlass pad with a wedge. Another consideration is power. The Tigress has a 1500 watt motor, which will easily handle our 300′ of chain and CQR. We should have more power than we will ever need from this windlass. It has a rope drum that can be independently operated and in an emergency, the windlass can be operated manually using the emergency handle provided. The Tigress operates electrically in both directions and can be lowered by gravity using the clutch if desired. My only complaint so far is that the documentation that comes with the Tigress leaves much to be desired and not much of anything is covered on the operation of the windlass. It is manufactured in Italy, which may explain some of the documentation issues. But as it is a popular model in the US sold by Imtra, I think they should put more effort into making a more usable installation, maintenance, and operation manual.
One of the first things we needed to research was how best to seal the core of the deck that would be exposed when we drilled the needed holes to install the windlass and the foot switch controls. We had heard about the process of overdrilling the holes and then filling them with epoxy resin and redrilling to the appropriate size. All but one of the resources we consulted about this said that it was not necessary and that the normal method used was to just slightly overdrill the holes if at all and then apply a couple coats of a penetrating epoxy to the core. In the end, we decided to use the penetrating epoxy, mostly because I could find no information on line showing the fill and drill method being used. The penetrating epoxy appears to be doing a fine job and at worst, we may need to reapply yearly to the core around the haus hole which will likely get some wear from the chain. The next dilemma was how to ensure that the holes we drilled would be absolutely straight. We would be using a steel backing plate that would need to line up exactly with the holes we would drill from topside. ![46441-04-200[1]](http://coolchangeadventures.com/wp-content/uploads/2013/02/46441-04-2001.jpg) To do this we found a great tool: the Rockler Portable Drill Guide. It turns your hand drill into a portable drill press, allowing you to drill holes completely straight or at a fixed angle. The base allows for using a hole saw as large as 2.5 inches. What would make this tool better is if the included chuck was 1/2″ rather than 3/8″. I had to purchase a step down drill bit to be able to drill the holes for the 10mm bolts used to anchor the windlass base to the deck. All in all though it is a great tool and I am leaving it on the boat as I know we will be using it again soon. To get started, Cindy and I first approximated where the windlass would be situated on the deck. A critical measurement on a horizontal windlass is to ensure that the chain has a straight lead to the bow roller and this pretty much dictates the placement. We lined it up and then went below to measure where the holes would be coming through from topside.
To do this we found a great tool: the Rockler Portable Drill Guide. It turns your hand drill into a portable drill press, allowing you to drill holes completely straight or at a fixed angle. The base allows for using a hole saw as large as 2.5 inches. What would make this tool better is if the included chuck was 1/2″ rather than 3/8″. I had to purchase a step down drill bit to be able to drill the holes for the 10mm bolts used to anchor the windlass base to the deck. All in all though it is a great tool and I am leaving it on the boat as I know we will be using it again soon. To get started, Cindy and I first approximated where the windlass would be situated on the deck. A critical measurement on a horizontal windlass is to ensure that the chain has a straight lead to the bow roller and this pretty much dictates the placement. We lined it up and then went below to measure where the holes would be coming through from topside. 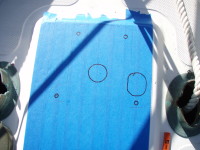
 We took our time with this and as a result, we moved it about an inch aft of our original location choice because we found that there was a contour that would interfere with the backing plate below decks. We also needed to try to place it where the chain would fall into the deepest part of the chain locker. When we were finally satisfied, we laid out blue tape on the deck and traced the backing plate to see where the holes would need to be drilled. The painters tape allowed both for both tracing the pattern and to help keep the fiberglass from splintering at the edge of the holes.
 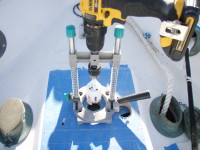 Now it was time to drill. I could not put it off any longer. Several of our dock neighbors were standing by ready to offer ridicule-laced condolences should the project go awry. (Just kidding, we love our dock mates. At this time we were actually in a rush to wrap up the day and get ready to go to a welcome party for our friends Rob and Nancy who are back for a visit while on a cruise to Mexico on their Oyster 485 Shindig). First we drilled out the bolt holes, and then used a hole saw to drill out the haus hole and the entrance for the electrical cabling that would need to come from below deck and attach to the terminal lugs at the rear of the windlass. A note here:
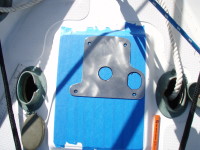
 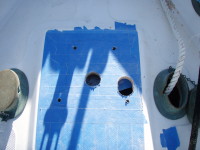 We purchased our windlass through Pacific Seacraft and Imtra, who is the American distributor for Lofrans. One of the sales engineers at Imtra gave me some great detailed notes on considerations for this installation that were a big help. One tip was that the area under the windlass where the wiring is brought in has some very sharp edges that could easily damage the insulation to the cable. He suggested using a dremel tool to soften the edges, which we did, so the cables can be run cleanly to the terminals. Next we needed to drill out the large 2.5 inch holes needed for the foot switches. A couple of considerations with regard to the foot switches: first, locate them where they can be safely operated without the operator getting too close to the working windlass but also allowing for a good view of the bow and the anchor entering and leaving the water.
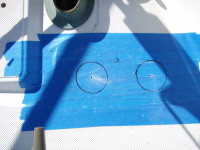
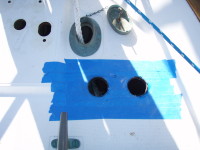 Another concern was that they should not be located in a wet location below decks and that the terminals need to be protected against accidental shorting. For us, this meant moving them outside of the chain locker. The PSC 31 has a nice little dry locker that is just aft of the chain locker. We positioned the foot switches above deck so that the switch body under deck would end up just inside this locker, which is dry and accessible. We will install a plastic cover to protect the terminal lugs. Once all the holes were drilled, the next step was to paint the exposed deck core with the penetrating epoxy to seal the core. We did this using a Scott two-part penetrating epoxy system. We mixed the two parts and used a small paint brush to apply the epoxy. It takes 24 hours to dry and you need to let it dry before allowing any other sealants or chemicals to come in contact with it.
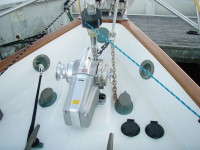
 Once cured, we bed the windlass and the foot switches using 3m 4200 adhesive sealant. The windlass bolts were 10mm stainless steel and go through a plastic insulator in the windlass base to help prevent dissimilar metals corrosion. Phase A, the mechanical installation of the windlass and footswitches, is now complete. Next weekend we will complete Phase B, which will consist of the remainder of the electrical installation, followed by loading the new chain and testing the operation. I think an anchor out for the night will be in order.