After calculating the current demands for our anticipated list of electrical equipment when we take off for our extended cruising in 2014, we decided that we needed to upgrade our house electrical bank from the current 100 Ah capacity to around 450 Ah. Our boat’s battery system consisted of two 100 Ah group 27 AGM batteries located in the starboard lazarette. The combined weight of these batteries is 124 lbs. One of the batteries was for the house and another for the engine start battery. After much research we decided on purchasing 2 Odyssey 1800 FT AGM batteries for the house bank which would give us a capacity of 428 Ah at 20hr rate. For the engine start battery we purchased an Odyssey PC925 marine AGM. ![PC925[1]](http://coolchangeadventures.com/wp-content/uploads/2013/02/PC9251.jpg) The 925 automotive version is the same battery that is used in Ducati motorcycles. (My brother Andrew will appreciate that fact.) The battery is very small at just 6.5″ x 7″ x 4.5 inches and weighs 24lbs, yet is capable of 925 cranking amps for 5 seconds. We decided to locate the starter battery in its original location in the lazarette and to move the house bank to a location on the center-line and well aft due to the weight which would be close to 300 lbs. This of course meant that we would have to come up with a suitable installation plan for the new house bank along with re-routing the wiring that connects it. We decided on the center-line in the aft quarter berth next to the bulkhead that
The 925 automotive version is the same battery that is used in Ducati motorcycles. (My brother Andrew will appreciate that fact.) The battery is very small at just 6.5″ x 7″ x 4.5 inches and weighs 24lbs, yet is capable of 925 cranking amps for 5 seconds. We decided to locate the starter battery in its original location in the lazarette and to move the house bank to a location on the center-line and well aft due to the weight which would be close to 300 lbs. This of course meant that we would have to come up with a suitable installation plan for the new house bank along with re-routing the wiring that connects it. We decided on the center-line in the aft quarter berth next to the bulkhead that 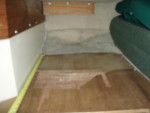 divides the berth from the head. There is a wet closet behind the head that would allow for re-routing of wiring to the new location. The next problem we needed to resolve was supporting the weight of the 300 lb battery bank . The deck that the batteries would be positioned on top of is just 1/2″ plywood spanning about 20″ between structural supports.
 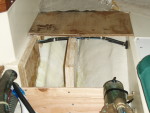 To support the weight we installed some plywood gussets under the deck and secured them via hardware and by tabbing them into the hull with fiberglass. In the process we also created a small storage area in the bilge (every inch of space counts on a 32 foot boat!) This will likely become our wine cooler where we will keep the finest bag wines available. The area underneath the battery bank is the stuffing box area and has good access to the new storage area. We had to position things far enough aft to be able to use the existing access panel.
 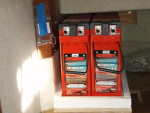 Another consideration was still being able to use the quarter-berth area for a bunk after the installation. The Odyssey 1800 FT has a footprint width of 4.9″. They accomplish this by making the battery longer, 22.1″ and taller at 12.44″ This allowed that we would only take up less than 10″ width out of the usable quarter berth area. Cindy would later cut and re-fabricate the mattress to fit around the base of the house bank. Once the structure was in place we built a platform for the batteries out of 3/4 ” plywood secured to the structural supports and topped with 1/2″ starboard material.
 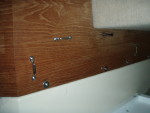 We added a 1″ fiddle around the base and through bolted hardware to the bulkhead and the battery base to locate three 1″ webbing cam straps which would secure the batteries and keep them from becoming a heavy projectile in the event of a knockdown or heaven forbid, a capsize. To facilitate geting the wiring to the new house bank and to make future connections and maintenance convenient, we built a new power distribution panel out of 1/2″ starboard and attached it to the same bulkhead just in front of the battery bank. The load calculations meant that we needed to use 1 awg wire to connect the house bank to the power distribution panel and protect with a 200 amp ANL type fuse block between the batteries and the panel.
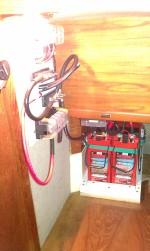
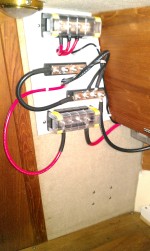 The wires that attach to the distribution panel including the 1 awg cable that will run to our new windlass (next project!) come to the bus bars through holes we drilled through the bulkhead and lined with hose material to eliminate any sharp edges that otherwise may have damaged the cables. The positive bus bars are protected against accidental contact with a plastic removable cover. We used a hydraulic crimping tool we purchased at harbor freight tools to crimp on all the lugs. One big issue we had in this installation was getting to the cables that were attached to the battery switch. When Pacific Seacraft built the boat they put the battery switch on the same bulkhead wall within easy reach of the companion way. The cabling went through a hollow in the bulkhead and routed back to the aft wet closet. When they installed it they attached the cables to the switch and then pulled the cables tight without leaving a maintenance loop.
  This made it extremely difficult to get the switch off the bulkhead to access the cables attached to it. We also had to re-locate the switch further aft because of no ability to get slack in the cables. This is one of very few design features in our boat that I am not happy with. It was quite a chore to deal with so if you ever attempt the same on a PSC 31, beware! Also, the original build did not have any fusing between the house bank and the main AC/DC power distribution panel, but most boats built at that time also lacked appropriate fusing as the ABYC electrical standards did not yet exist. In spite of this the majority of the wiring on the boat was done neatly and safely, consistent with the high quality build standards of Pacific Seacraft. This phase A of the electrical upgrade is now complete. Phase B will consist of replacing and relocating our AC battery charger with a high capacity unit mounted in the vicinity of the house bank and replacing our 55 amp Yanmar alternator with a 100 amp Balmar and a MC-614 charger controller as recommended by the sales engineers at Odyssey.
  The final part of the project will be the installation of a Victron BMV 600 Battery monitor which will be located on a bulkhead in the Nav station area for easy viewing. It is the recommended choice of several of our neighbors and friends on B dock and quite reasonably priced. (at least for a boat part…)
-
Subscribe to our blog
A most excellent adventure
Blogroll
Useful or Interesting Links
Where we are now
Categories
- Anchoring Systems
- Back in the States
- Cindy’s posts
- Cruising Southern California
- Deck and exterior maintenance
- Dinghy and Outboard Motor
- Electrical system
- Electrical system
- Electronics
- Engine
- Interior Cabin, Galley, Head
- Land Yacht 2021
- Living the Dream – Our Trip has Begun
- Maintenance and Enhancements
- Maintenance Expenses
- Plumbing
- Preparation Details
- Ricks thoughts so far.
- River running
- Sailing and Living in Mexico
- Sailing Northern California
- Sailing the Seven Seas
- Sailing the South Pacific
- Sails and Rigging
- Sausalito
- Uncategorized
Archives
- September 2023 (1)
- June 2023 (1)
- May 2023 (1)
- December 2022 (1)
- October 2022 (1)
- September 2022 (2)
- August 2022 (3)
- July 2022 (4)
- February 2022 (1)
- December 2021 (1)
- November 2021 (4)
- October 2021 (5)
- September 2021 (3)
- August 2021 (5)
- July 2021 (4)
- June 2021 (4)
- November 2019 (2)
- August 2019 (1)
- July 2019 (1)
- June 2019 (1)
- April 2019 (1)
- March 2019 (1)
- November 2018 (1)
- October 2018 (1)
- September 2018 (1)
- August 2018 (1)
- July 2018 (4)
- March 2018 (1)
- January 2018 (1)
- November 2017 (1)
- August 2017 (1)
- July 2017 (1)
- May 2017 (3)
- April 2017 (1)
- March 2017 (1)
- February 2017 (1)
- January 2017 (4)
- December 2016 (1)
- July 2016 (1)
- May 2016 (3)
- March 2016 (2)
- February 2016 (4)
- January 2016 (1)
- December 2015 (3)
- November 2015 (1)
- October 2015 (3)
- September 2015 (2)
- July 2015 (2)
- April 2015 (2)
- March 2015 (3)
- February 2015 (2)
- January 2015 (4)
- December 2014 (4)
- November 2014 (2)
- October 2014 (4)
- September 2014 (10)
- August 2014 (6)
- June 2014 (1)
- February 2014 (5)
- December 2013 (1)
- November 2013 (4)
- September 2013 (4)
- June 2013 (4)
- May 2013 (13)
- February 2013 (2)
- January 2013 (1)
- December 2012 (2)
- September 2012 (3)
- July 2012 (2)
- June 2012 (3)
- May 2012 (7)
- February 2012 (3)
- December 2011 (3)
- November 2011 (3)
- October 2011 (9)